*This will save your certificates to `/etc/letsencrypt/live/yourdomain.com/`.*
3. **Verify:**
If the process was successful, you should see output like this:
“`bash
Successfully received certificate.
Certificate is saved at: /etc/letsencrypt/live/your.domain.com/fullchain.pem
Key is saved at: /etc/letsencrypt/live/your.domain.net/privkey.pem
This certificate expires on 2026-07-19.
These files will be updated when the certificate renews.
Certbot has set up a scheduled task to automatically renew this certificate in the background.
Kasm looks for its certificates in `/opt/kasm/current/certs/`. Instead of copying the files, it is best practice to use **symbolic links** so that when Let’s Encrypt auto-renews, Kasm automatically sees the new files.
5. **Note:** If you prefer not to open port 80 or stop Kasm for renewals, consider using the **DNS-01 challenge** with Certbot (e.g., `certbot-dns-cloudflare`), which verifies ownership via DNS records rather than a web server.
If you want a lightweight, self-hosted seedbox, Deluge is a great option; it’s a Python-based BitTorrent client with a powerful Web UI and solid community support.
In this guide, we’ll move beyond a basic Deluge environment by securing remote access to the web interface by using Nginx as a reverse proxy and encrypting all traffic with HTTPS via Let’s Encrypt SSL.
This powerful combination not only secures your torrent client but also provides a method to manage your downloads remotely and view the finished files directly on the server via HTTPS or SFTP (FTP over SSH).
Requirements
Server/VPS with at least 1 GB of Memory.
Root (sudo) access.
A compatible OS:
Debian 13 (Trixie)
Ubuntu 22 (Jammy)
Ubuntu 24 (Noble)
Fully Qualified Domain Name (FQDN) pointed to the Server’s IP via A/AAAA record.
ex. server.ts4.net has address 192.249.57.21
Step 1: Install Deluge
First, we’ll install the Deluge packages from the repository.
For Ubuntu, the official repositories often lag behind the latest Deluge releases. To ensure you get the newest stable version, add the official Deluge PPA.
In addition to accessing files over HTTP, you can also retrieve completed downloads via SFTP. To make SFTP access easier, create a symlink in the SFTP user’s home directory that points to Deluge’s download folder:
Running Deluge as a service ensures that it starts automatically at boot, runs under a dedicated, non-root user for enhanced security and automatically restarts itself in the event of a crash, guaranteeing maximum uptime and reliability.
This is achieved by defining two specific systemd unit files: one for the deluged daemon (the core engine) and one for the deluge-web interface (the remote access component), with each service to write to its own dedicated log file.
Create Systemd Unit Files
Create these two unit files in your /etc/systemd/system/ folder:
Once the services are launched, check the status to ensure both are “active“:
sudo systemctl status deluged deluge-web
Test Deluge
With both the deluged daemon and deluge-web interface running as services, your Deluge setup is now fully operational and ready to manage torrents.
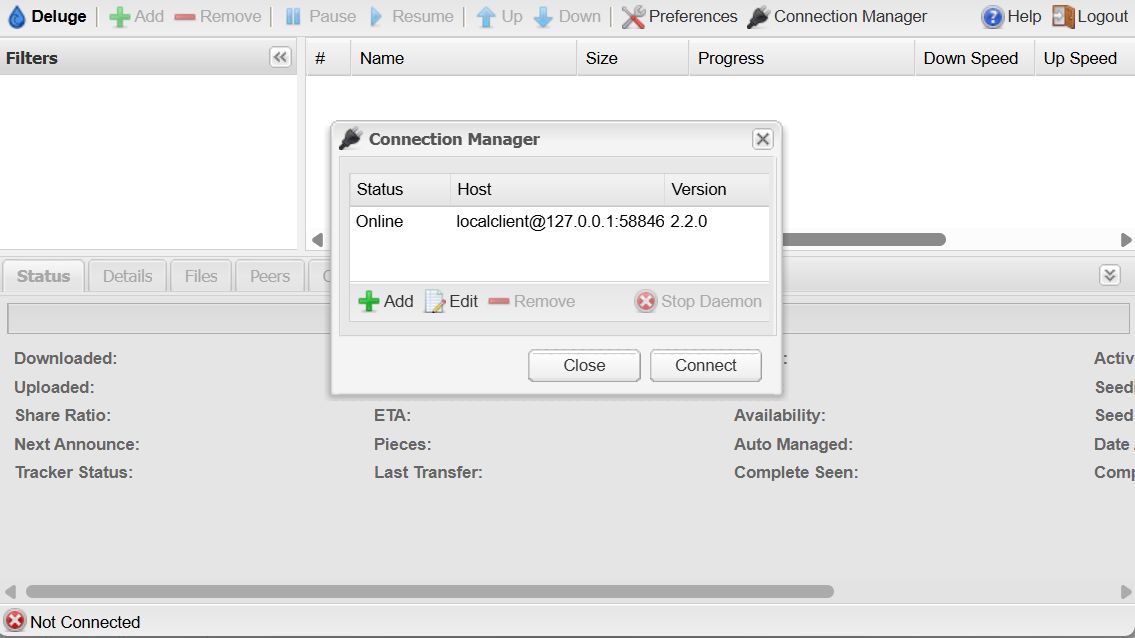
To access the Deluge WebUI interface temporarily, open your web browser and navigate to Server IP address on port 8112 (e.g., http://your_server_ip:8112).
The default WebUI password is deluge; once logged in, you must connect to the local Deluge daemon running on 127.0.0.1.
Although this initial connection is unsecured HTTP, you may safely queue up your first downloads now.
The following steps will focus on permanently securing WebUI access by configuring Nginx as a reverse proxy and enabling HTTPS via Let’s Encrypt SSL.
Part 2 – Setup Nginx
Step 4: Install Nginx and Certbot
Now that the basics are setup, it’s time to make Deluge more user friendly by adding a Reverse Proxy to access Deluge-Web securely via HTTPS and adding a directory-based file browser to make downloading files from the server easier.
We’ll use Nginx as a reverse proxy to serve Deluge securely under HTTPS, and use CertBot to provide the SSL certificate.
Install Nginx
sudo apt-get install nginx snapd -y
Install CertBot
sudo snap install --classic certbot
Finally with Certbot installed, we can request a Let’s Encrypt certificate (replace my.domain.net with your (sub)domain):
To enable HTTP-based file browsing and downloading, we’ll need to add the Nginx user to the Deluge user group, in order for Nginx to be able to read the Downloads directory.
The default username for Nginx on Ubuntu is www-data.
sudo usermod -aG deluge www-data
Reload Nginx
Now we can verify the config file, and reload Nginx:
sudo nginx -t
sudo systemctl reload nginx
If Nginx reloaded succcessfully, you can now access your Deluge Reverse-Proxy, and /files/ download directory via HTTPS.
Deluge Web UI → https://my.domain.net/deluge/
Download directory → https://my.domain.net/files/
SSL will be renewed automatically ever 65 days via the snapd job.
Step 6: Secure Deluge
At this point, the initial installation process is complete and we’re ready to secure Deluge.
Update the default Deluge WebUI password.
The default Deluge WebUI password is deluge; this should be changed immediately.
You can update the default password via Deluge WebUI > Preferences > Interface.
Restrict Access to Deluge Port
Although we have setup a Nginx reverse-proxy to allow secure HTTPS access to the Deluge WebUI via /deluge/, the original port 8112 backend is still pubicly accessible, and it should be blocked.
Blocking port 8112 ensures the only way to access Deluge WebUI is via the secure Nginx reverse-proxy.
Setup deluge-firewall service
We can block access to Port 8112 via IP Tables without the need for an additional firewall like UFW or Firewalld.
To setup the firewall rules, create a new file – /etc/systemd/system/deluge-firewall.service – and add the following content:
[Unit]
Description=Firewall rules for Deluge
Before=deluge-web.service
Wants=network.target

[Service]
Type=oneshot

# ------------------------------
# Add rules when starting service
# ------------------------------
ExecStart=/bin/sh -c 'iptables -C INPUT -i lo -p tcp --dport 8112 -j ACCEPT 2>/dev/null || iptables -A INPUT -i lo -p tcp --dport 8112 -j ACCEPT'
ExecStart=/bin/sh -c 'iptables -C INPUT -p tcp --dport 8112 -j DROP 2>/dev/null || iptables -A INPUT -p tcp --dport 8112 -j DROP'

# ------------------------------
# Remove rules when stopping service
# ------------------------------
ExecStop=/bin/sh -c 'iptables -C INPUT -i lo -p tcp --dport 8112 -j ACCEPT 2>/dev/null && iptables -D INPUT -i lo -p tcp --dport 8112 -j ACCEPT'
ExecStop=/bin/sh -c 'iptables -C INPUT -p tcp --dport 8112 -j DROP 2>/dev/null && iptables -D INPUT -p tcp --dport 8112 -j DROP'

RemainAfterExit=yes

[Install]
WantedBy=multi-user.target
Start deluge-firewall service
After the unit file has been created, we must reload the Systemd daemon in order to enable the deluge-firewall service.
Enabling deluge-firewall as a service ensures the necessary firewall rules are automatically re-created when the server reboots.
Deluge will now automatically connect to the local Deluged daemon when you login to the WebUI, without being prompted to select a Server.
SSH
Add your SSH key(s) to the root, and download users ~/.ssh/authorized_keys file
Restrict SSH access to keys-only by updating /etc/ssh/sshd_config to include:
PermitRootLogin without-password
PasswordAuthentication no
# Force PermitRootLogin to 'without-password'
sudo sed -i.original_config -r '/^\s*PermitRootLogin\s+/d' /etc/ssh/sshd_config
sudo echo "PermitRootLogin without-password" | sudo tee -a /etc/ssh/sshd_config

# Force PasswordAuthentication to 'no'
sudo sed -i -r '/^\s*PasswordAuthentication\s+/d' /etc/ssh/sshd_config
sudo echo "PasswordAuthentication no" | sudo tee -a /etc/ssh/sshd_config
Now check the settings are properly set:
# Check that these new settings are correctly set
sudo grep -E '^\s*(PermitRootLogin|PasswordAuthentication)\s+' /etc/ssh/sshd_config
We should see the following:
~# sudo grep -E '^\s*(PermitRootLogin|PasswordAuthentication)\s+' /etc/ssh/sshd_config
PermitRootLogin without-password
PasswordAuthentication no
If everything looks right, restart the SSH daemon
# Restart the SSH daemon
sudo systemctl restart ssh
Server Time
It’s recommended to set the server’s timezone to your local timezone (or to UTC).
Setting the correct timezone ensures that file modification times and timestamps in logs align with your local machine, improving consistency when integrating with other tools and making log review and troubleshooting much easier.
To see a list of timezones, use timedatectl list-timezones:
sudo timedatectl list-timezones
Once you have determined the local time zone, you can set the server’s local time zone to match via timedatectl set-timezone.
To set the server time to UTC:
sudo timedatectl set-timezone UTC
Most servers will be configured to automatically sync the time via NTP; you can check the time sync status via timedatectl
# timedatectl
               Local time: Sat 2025-11-15 20:44:12 EST
           Universal time: Sun 2025-11-16 01:44:12 UTC
                 RTC time: Sun 2025-11-16 01:44:12
                Time zone: America/New_York (EST, -0500)
System clock synchronized: yes
              NTP service: active
          RTC in local TZ: no
If the NTP service is inactive or otherwise stopped, you can re-enable it via set-ntp true:
sudo timedatectl set-ntp true
Automatic OS Package Updates
Keep your system updated automatically with the unattended-upgrades package.
Install the unattended-upgrades package (if not already installed):
When prompted to Automatically download and install stable updates? – Select “Yes“.
If the package is already installed, use dpkg-reconfigure to re-configure the automatic update settings:
sudo dpkg-reconfigure unattended-upgrades
Enable Automatic Reboot [Optional]
Note that unattended-upgrades will not automatically reboot the VPS; you may want to enable this and configure a specific reboot time in the unattended-upgrades config:
# Set unattended-upgrades to automatically reboot if necessary
# This changes the line //Unattended-Upgrade::Automatic-Reboot "false"; to true
sudo sed -i 's/\/\/Unattended-Upgrade::Automatic-Reboot "false";/Unattended-Upgrade::Automatic-Reboot "true";/' /etc/apt/apt.conf.d/50unattended-upgrades

# Set the time for the reboot (e.g., 2 AM)
# This changes the line //Unattended-Upgrade::Automatic-Reboot-Time "02:00";
sudo sed -i 's/\/\/Unattended-Upgrade::Automatic-Reboot-Time "02:00";/Unattended-Upgrade::Automatic-Reboot-Time "04:00";/' /etc/apt/apt.conf.d/50unattended-upgrades
Troubleshooting
Nginx shows 502 Bad Gateway
Check if the Deluge Web service is running:
systemctl status deluge-web
If not, restart it:
sudo systemctl restart deluge-web
Verify it’s listening on port 8112:
netstat -tulpn | grep 8112
Permission errors with downloads
Ensure your user is part of the deluge group:
sudo usermod -aG deluge yourusername
Log out and back in for group changes to take effect.
Deluge Web UI not loading properly under /deluge/
Make sure the proxy_set_header X-Deluge-Base "/deluge/"; line is included in your Nginx config.
Clear browser cache or try incognito mode to rule out cached redirects.
SSL certificate issues
Ensure your domain’s DNS points to your VPS before running Certbot.
If renewal fails, you can manually renew:
sudo certbot renew --dry-run
Conclusion
You now have a Deluge seedbox running behind Nginx with HTTPS. This setup is secure, easy to manage, and lets you remotely control your torrents while also serving completed downloads via the web.
Check the status to make sure everything launched:
sudo systemctl status deluged deluge-web
Step 4: Test Deluge [Optional]
If both services are actively running, Deluge is now fully functional and ready to start downloading files, so it’s fine to queue something up for download while we work on the final configruation steps.
To access Deluge-Web, open your Web Browser and access the Server IP’s using HTTP via Port 8112.
http://your-ip-add-ress:8112
The default password is deluge
Once logged in, connect to the local Deluge daemon running on 127.0.0.1.
Step 4: Install Nginx and Certbot
Now that the basics are setup, it’s time to make Deluge more user friendly by adding a Reverse Proxy to access Deluge-Web securely via HTTPS and adding a directory-based file browser to make downloading files from the server easier.
We’ll use Nginx as a reverse proxy to serve Deluge securely under HTTPS, and use CertBot to provide the SSL certificate.
Install Nginx
sudo apt-get install nginx snapd -y
Install CertBot
sudo snap install --classic certbot
Finally with Certbot installed, we can request a Let’s Encrypt certificate (replace my.domain.net with your (sub)domain):
Add nginx to the Deluge group so it can access the files written by Deluge, allowing HTTP download capability via /files/.
The default username for Nginx on Ubuntu is www-data.
sudo usermod -aG deluge www-data
Now we can verify the config file, and reload Nginx:
sudo nginx -t
sudo systemctl reload nginx
If Nginx reloaded succcessfully, you can now access your Deluge Reverse-Proxy, and /files/ download directory via HTTPS.
Deluge Web UI → https://my.domain.net/deluge/
Download directory → https://my.domain.net/files/
Step 6: Secure and Maintain
Change the default Deluge Web password immediately (Preferences → Interface).
Add your SSH key(s) to the root, and download users.
Restrict SSH access to keys-only by updating ssh_config to include:
PermitRootLogin without-password
PasswordAuthentication no
systemctl restart ssh
Wipe the default Nginx HTML file]
`
Keep your system updated:
sudo apt-get update && sudo apt-get upgrade -y
Troubleshooting
Nginx shows 502 Bad Gateway
Check if the Deluge Web service is running: systemctl status deluge-web
If not, restart it: sudo systemctl restart deluge-web
Verify it’s listening on port 8112: netstat -tulpn | grep 8112
Permission errors with downloads
Ensure your user is part of the deluge group: sudo usermod -aG deluge yourusername
Log out and back in for group changes to take effect.
Deluge Web UI not loading properly under /deluge/
Make sure the proxy_set_header X-Deluge-Base "/deluge/"; line is included in your Nginx config.
Clear browser cache or try incognito mode to rule out cached redirects.
SSL certificate issues
Ensure your domain’s DNS points to your VPS before running Certbot.
If renewal fails, you can manually renew: sudo certbot renew --dry-run
Conclusion
You now have a Deluge seedbox running behind Nginx with HTTPS. This setup is secure, easy to manage, and lets you remotely control your torrents while also serving completed downloads via the web.
I recently picked up a VK-162 USB GPS module from AliExpress for about $8. It’s a simple, plug-and-play GPS receiver that presents itself as a serial device (on Windows, it shows up as a COM port) as opposed to most cheap GPS units, which only offer a UART output.
This same device is also known as the “G-Mouse USB GPS dongle”
Surprisingly, when I went looking for examples on how to actually read and parse data from this module, I didn’t find much. So I put together a small script that works reliably, and I’m sharing it here in case it helps someone else.
Features
Built in Ublox G6010 / G7020 GPS chipset.
50 channel GPS L1 frequency C/A Code.
Superior sensitivity up to -162dBm.
Built-in WAAS/EGNOS/MSAS Demodulator without any additional hardware.
Low power consumption.
Waterproof design.
USB interface with a 2m long cable.
Magnetic base.
Compatible with Linux & Windows.
Specifications
Tracking sensitivity: -160dBm
Acquisition sensitivity: -146dBm
Cold start time: 32s [average]
Warm start time: 32s [average]
Hot start time: 1s [average]
Recapture Time: 0.1s [average]
How It Works
When you connect the VK-162 to your PC and open the COM port (e.g., with PuTTY), you’ll see NMEA sentences streaming in, such as:
Although that’s valid GPS data, it’s not very user-friendly and requires further processing to be human-readable.
NMEA definitions:
$GPVTG → Course and speed over ground. $GPRMC → Recommended Minimum GPS data (time, status, lat/lon, speed, date). $GPGGA → Fix data (quality, satellites, altitude). $GPGSA → DOP (dilution of precision) and active satellites. $GPGLL → Geographic position.
Parsing NEMA Sentences
With Python and a couple of libraries (pyserial and pynmea2), you can parse these NMEA sentences and present them in a more readable way.
Note: I added a simple configuration flag for RAW_OUTPUT so you can choose whether to display the raw NMEA data alongside the parsed output, in case it’s not working as expected.
Install dependencies before running:
pip install pyserial pynmea2
Python Script
The example Python script will parse the NEMA sentences into a human readable output.
Configuration
At the top of the script, in the Config section, there’s configuration variables to set the the PORT & if RAW_OUTPUT status:
# --- Config ---
PORT = "COM9"
RAW_OUTPUT = False   # Set True to show raw NMEA sentences
BAUDRATE = 9600
# ---------------
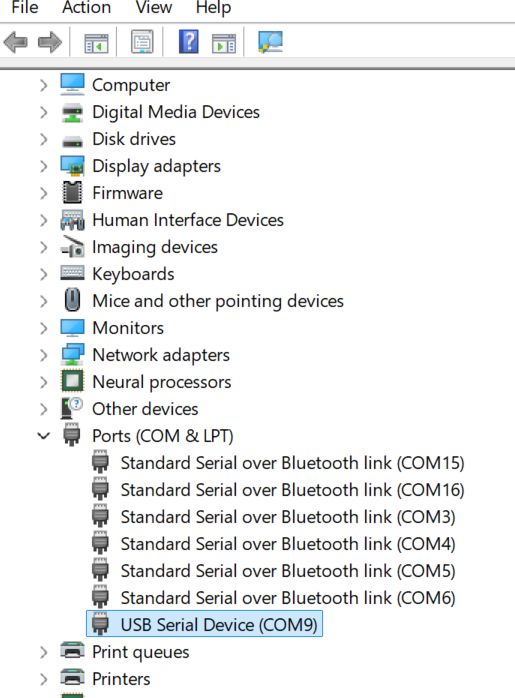
You MUST set the correct PORT prior to running the script.
In most cases, the device will be listed as a USB Serial Device in your Windows Device Manger.
Example Code
import serial
import pynmea2

# --- Config ---
PORT = "COM9"
RAW_OUTPUT = False   # Set True to show raw NMEA sentences
BAUDRATE = 9600
# ---------------

def main():
    ser = serial.Serial(PORT, baudrate=BAUDRATE, timeout=1)
    print(f"Listening to GPS on {PORT}... (Ctrl+C to stop)")

    while True:
        try:
            line = ser.readline().decode('ascii', errors='replace').strip()
            if not line.startswith('$'):
                continue

            if RAW_OUTPUT:
                print(f"RAW: {line}")

            try:
                msg = pynmea2.parse(line)

                if isinstance(msg, pynmea2.types.talker.RMC):
                    print(f"[RMC] Time: {msg.datestamp} {msg.timestamp}")
                    print(f"      Status: {'Active (fix)' if msg.status == 'A' else 'Void (no fix)'}")
                    print(f"      Lat/Lon: {msg.latitude}, {msg.longitude}")
                    print(f"      Speed (knots): {msg.spd_over_grnd}, Course: {msg.true_course}")
                    print("-" * 40)

                elif isinstance(msg, pynmea2.types.talker.GGA):
                    print(f"[GGA] Fix Quality: {msg.gps_qual}")
                    print(f"      Satellites: {msg.num_sats}")
                    print(f"      Altitude: {msg.altitude} {msg.altitude_units}")
                    print("-" * 40)

                elif isinstance(msg, pynmea2.types.talker.GSA):
                    print(f"[GSA] Mode: {msg.mode}, Fix Type: {msg.mode_fix_type}")
                    print(f"      PDOP: {msg.pdop}, HDOP: {msg.hdop}, VDOP: {msg.vdop}")
                    print("-" * 40)

            except pynmea2.nmea.ParseError:
                continue

        except KeyboardInterrupt:
            print("Exiting...")
            break

if __name__ == "__main__":
    main()
Listening to GPS on COM9... (Ctrl+C to stop)
[RMC] Time: 2025-09-16 23:31:17+00:00
      Status: Active (fix)
      Lat/Lon: 35.80946866666667, -82.48338616666666
      Speed (knots): 0.112, Course: None
----------------------------------------
[GGA] Fix Quality: 1
      Satellites: 08
      Altitude: 757.2 M
----------------------------------------
[GSA] Mode: A, Fix Type: 3
      PDOP: 1.94, HDOP: 1.05, VDOP: 1.63
----------------------------------------
No GPS Fix
If your device has not yet completed the GPS fix, you will see Status: Void. —————————————- Raw: $GPGSV,1,1,01,16,,,25*78 Raw: $GPGLL,,,,,,V,N*64 Raw: $GPRMC,,V,,,,,,,,,,N*53 Time: None None Status: Void (no fix) Lat/Lon: 0.0, 0.0 Speed (knots): None, Course: None —————————————-
It can take up to 180 seconds to achieve a fix from a cold boot; make sure the device is near a window and has a line of sight to the outside sky.
Conclusion
For less than $10, this little VK-162 USB GPS dongle works great with Python. By parsing the NMEA output with pynmea2, you can easily log your position, altitude, and satellite info, or even integrate it into larger projects like mapping or robotics.
Sometimes the cheap modules on AliExpress end up being surprisingly useful — and with a bit of code, you can unlock their potential.
The process of installing the Omada Software Controller on a Raspberry Pi is reasonably straightforward, with a few quirks due to the platform not being officially supported by TP-Link Omada.
Requirements
Raspberry Pi 4(or 5) with 4GB+ Memory Compatible TP-Link Omada Router(ER605)
Raspberry Pi Imager – This is my preferred tool for setting up a Raspberry Pi OS image.
The Raspberry Pi Imager tool lets you pre-configure the Hostname, Login Credentials, SSH Keys, and other options not available with standalone image writing tools like BalenaEtcher.
Balena Etcher – Popular cross-platform tool for writing images to USB/SD Cards.
USB Imager – Lightweight Open Source image writing tool; works with standard user-level accounts in Windows.
Raspberry Pi Setup
Once you have configured your MicroSD card with the Ubuntu Server image, login to the Raspberry Pi via SSH, or the local console. If you didn’t use the Raspberry PI Imager to pre-configure your login details, you’ll have to set a new password after the first login(Default login is ubuntu/ubuntu).
Double-check that all unattended upgrades are complete.
Before we begin, double-check that any unattended upgrades are complete.
It may take a few moments to complete the installation. The network controller will start up automatically as part of the install process.
Installation Example Output:
root@omadapi:~# dpkg -i omada_v5.15.24.18_linux_x64_20250630184434.deb
Selecting previously unselected package omadac.
(Reading database ... 59655 files and directories currently installed.)
Preparing to unpack omada_v5.15.24.18_linux_x64_20250630184434.deb ...
JRE 17.0.15 is greater than 8 and JSVC 1.0.15 is less than 1.1.0
Unpacking omadac (5.15.24.18) ...
Setting up omadac (5.15.24.18) ...
Install Omada Controller succeeded!
==========================
current data is empty
Omada Controller will start up with system boot. You can also control it by [/usr/bin/tpeap].
check omada
Starting Omada Controller. Please wait.
............
Started successfully.
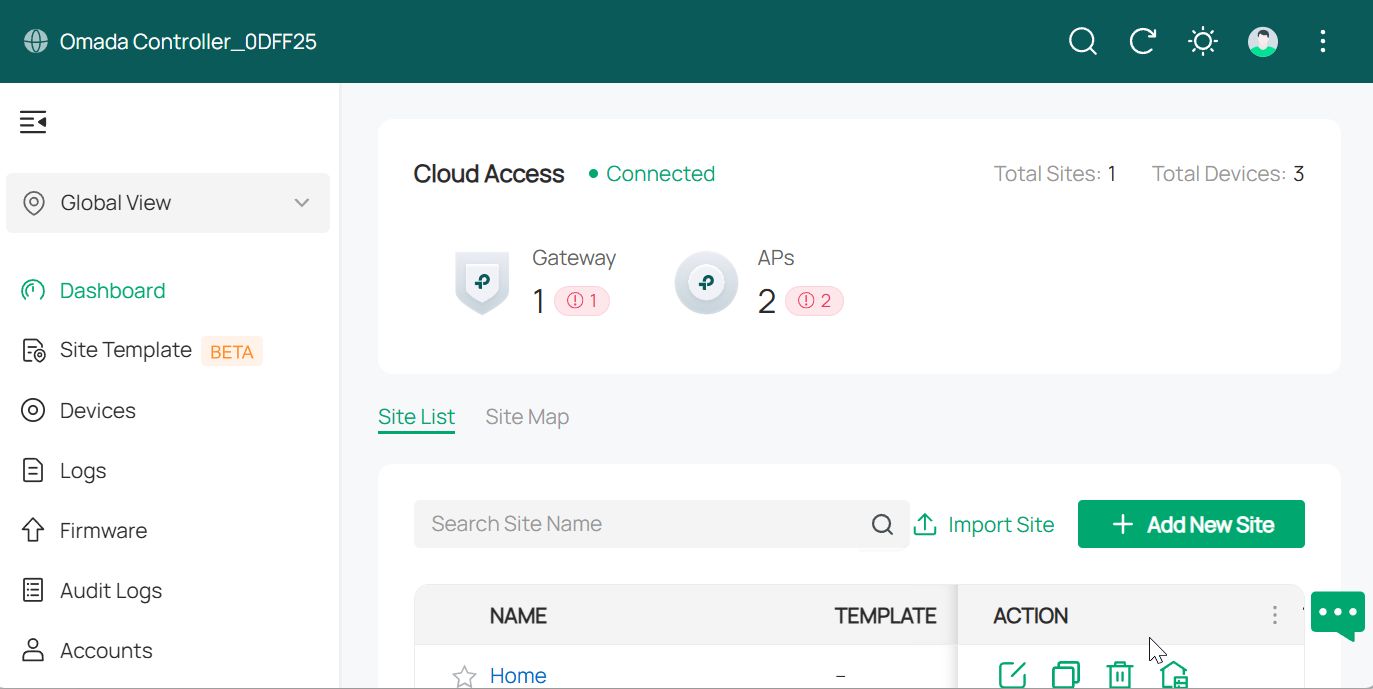
You can visit http://localhost:8088 on this host to manage the wireless network.
Once the installation is complete, you’ll be able to access the Omada Network Controller in your browser
The T-Deck Plus is a great LoRa product made by Lillygo that includes all the necessary hardware to use the Meshtastic framework in an easy-to-use form factor.
The problem is the default UI is… awful. It’s designed for small OLED read-only devices, and thus does not take advantage of the Blackberry-eqsue nature of the T-Deck device.
The solution is the “FancyUI” firmware; a development work-in-progress build that offers a much more user friendly UI, and shows some of the potential what the device can become in the future.
You can easily build your own firmware image using GitPod, an online build environemtn. All you need is a free GitHub account to get started.
Create a new Work Space
Access GitPod, and allow GitPod to access your GitHub account to create your new Work Space:
Now that the Work Space is up-to-date, we’re ready to build the latest Meshtastic Firmware for our T-Deck-Plus.
First make sure you have the latest files; if this is your first build, the files should be up to date already.
git pull
Next we’ll make a new branch to work with where we build our firmware
git switch tft-gui-work
Now we can init the sub modules that we need
git submodule update --init
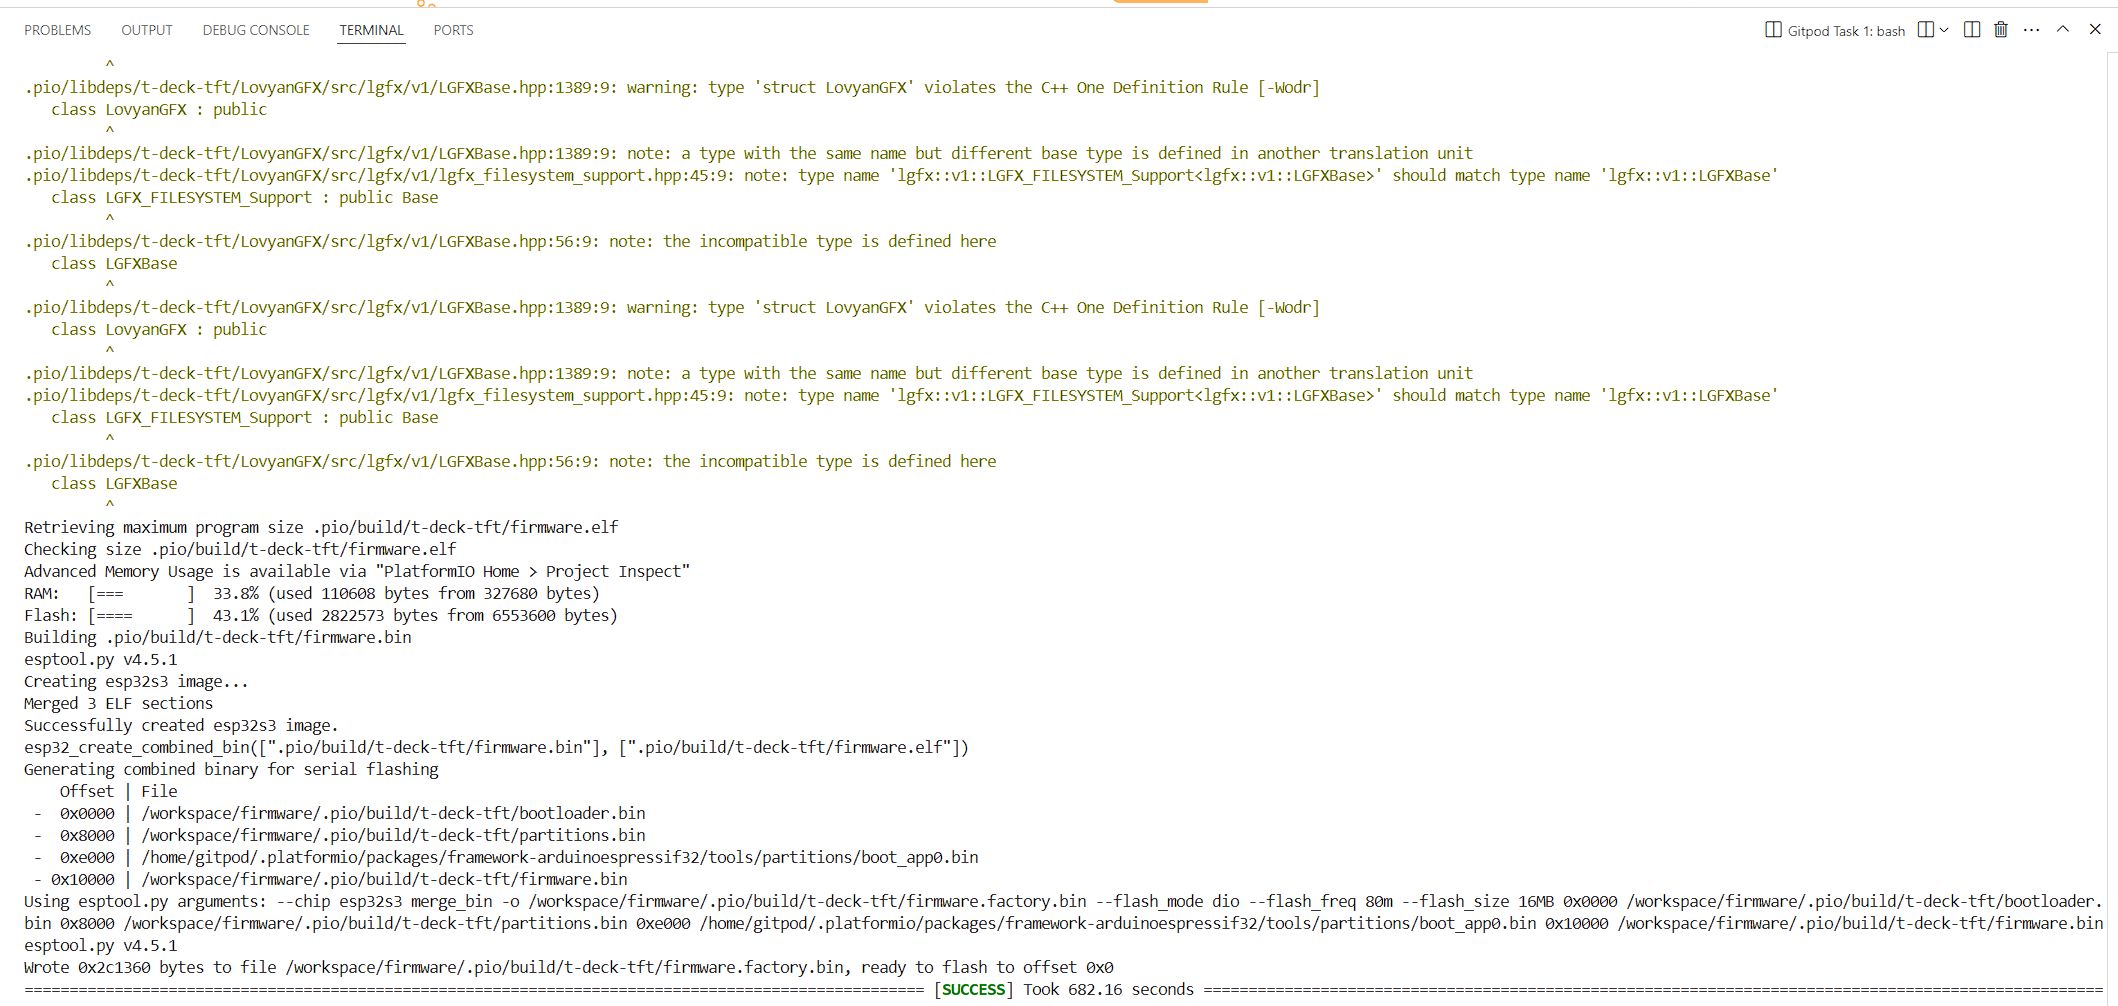
And finally build our firmware binaries, this part will take a few minutes(more like 10)
pio run -e t-deck-tft
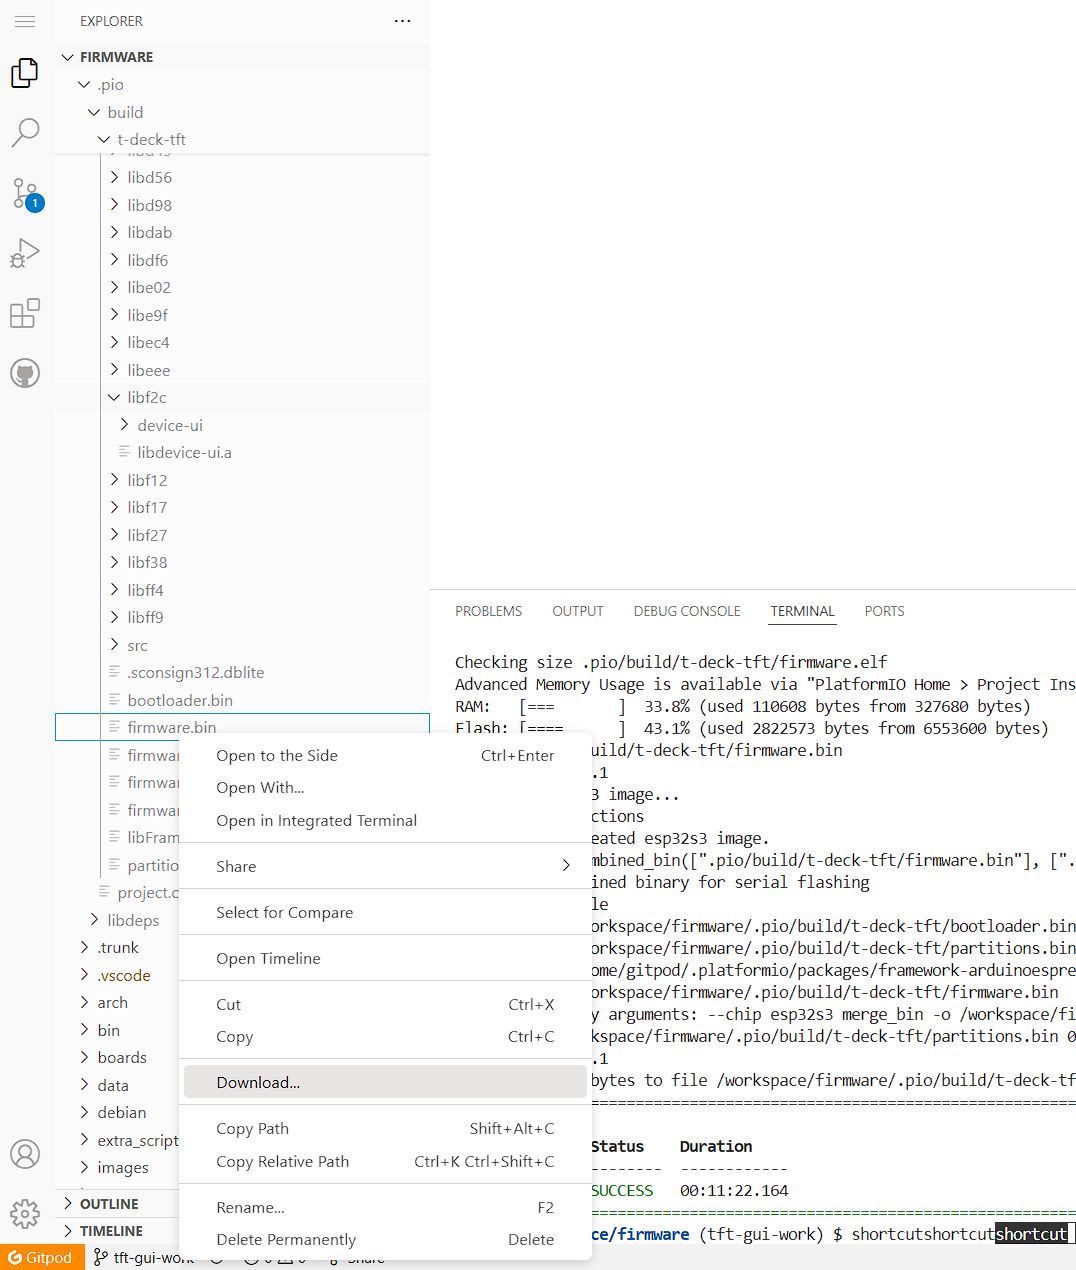
Once the build is complete, you’re ready to download the firmware.bin from the path specified in the terminal – /workspace/firmware/.pio/build/t-deck-tft/firmware.bin
To access the files, use the file browser on the left-hand-bar. Right click on the file in the file browser, and click Download to download the firmware.bin to your local PC.
Once we have the firmware.bin on our PC, we’re ready to shut-down the Work Space and flash our T-Deck.
Build Command Summary:
git pull
git switch tft-gui-work
git submodule update --init
pio run -e t-deck-tft
Proceed with the initial T-Deck install, then use the Web or SD flasher methods to update the device.
If you are using the Web based method; first login to your Access Point on the T-Deck, then navigate to the IP address provided, and login with the username & password shown.
Click on OTA Update and select the firmware.bin file downloaded from GitPod to install.
Wait for the update to complete and reboot the T-Deck.
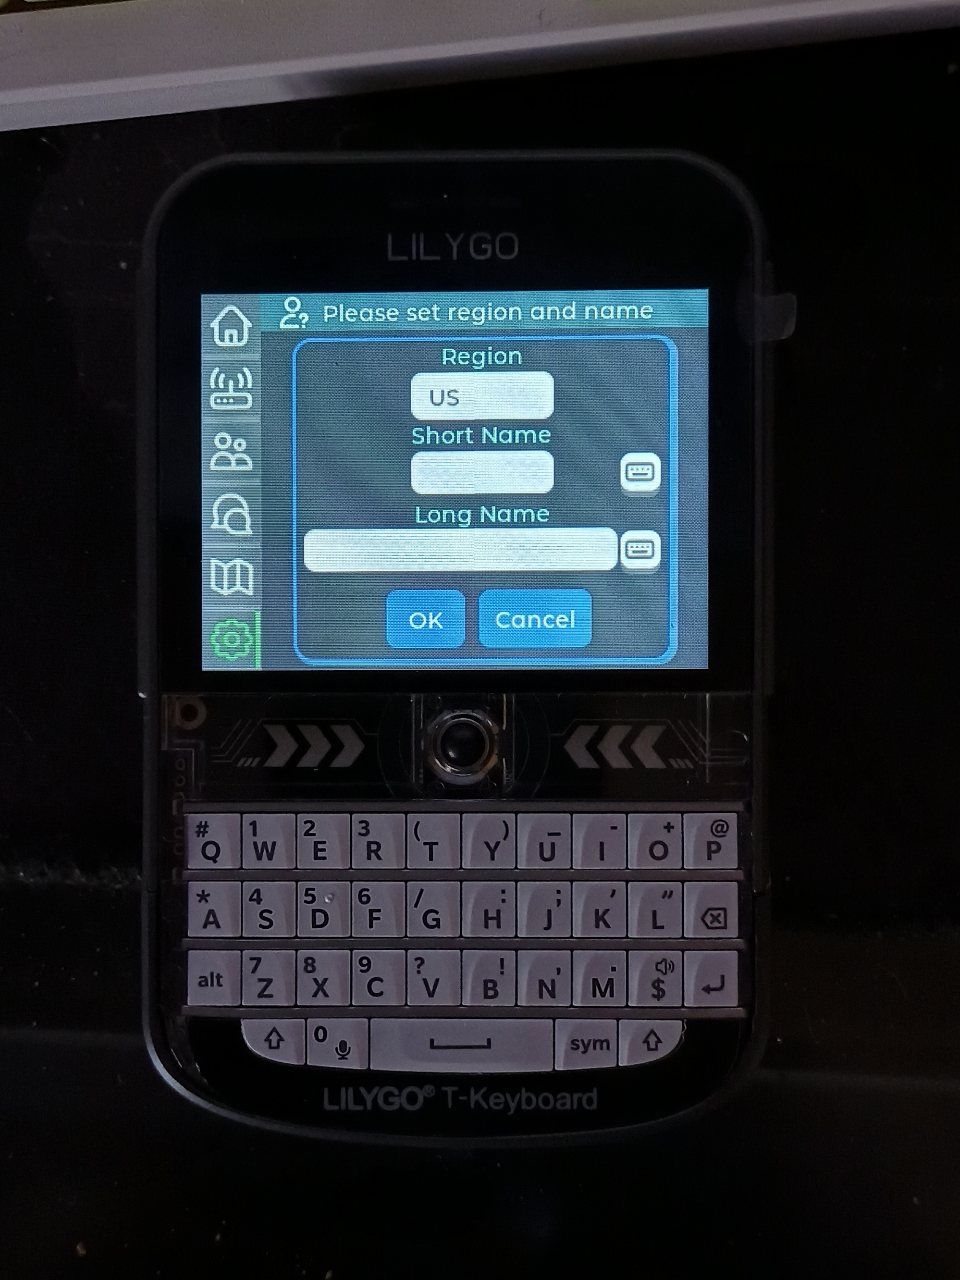
Upon the next boot, you should be staring at the T-Deck “FancyUI”, where you’ll need to configure the Region & usual Meshtastic Settings.
Someone on LowEndTalk recently posted a great script to automatically configure IPv6 on Online.net’s dedicated servers. Since I’ve recently been using one of their 2EUR Kidéchire specials as a Deluge & SABnzbd box I found this quite useful.
Script Usage:
This script is designed to be run on an Online.net Dedicated Server, it has been tested on:
wget www.sonicboxes.com/scripts/online_net_ipv6_dhclient_Jan17.tar.gz
tar -xf online_net_ipv6_dhclient_Jan17.tar.gz
cd ipv6-dhclient-script
chmod 755 ipv6_dhclient_online_net.sh
./ipv6-dhclient-script.sh <interface> <address block> <subnet> <duid>
Example:
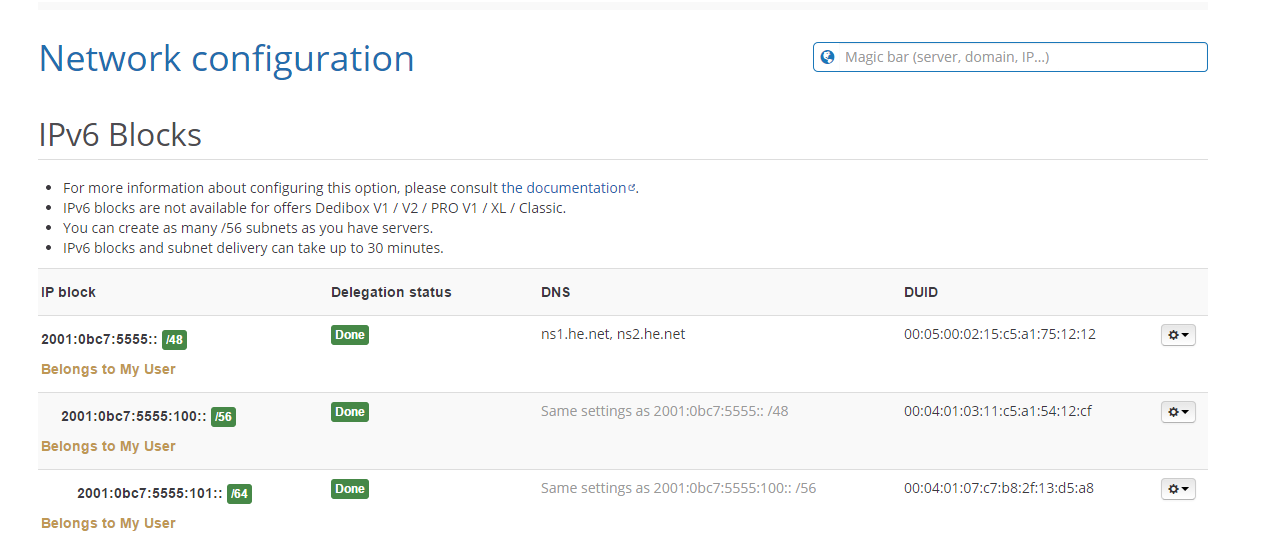
All of the required information can be found on your Online.net Network configuration page (console.online.net >> Server >> Network configuration). It should look like this:
In this example, we’ll be adding the subnet 2001:0bc7:5555:101::/64 to our dedicated server via the following command:
Your server should now have outgoing IPv6 connectivity and you should be able to ping the assigned address, in this example – 2001:0bc7:5555:101::1, from an outside network.
Deluge is a BitTorrent client written in python based on libtorrent. Deluge is my favorite BitTorrent client because it’s got some great features like:
09/08/16 – Updated for Deluge 1.3.13 – Tested on Debian 8/Ubuntu 16.04
Not only have I found Deluge to be faster than many of the other BitTorrent clients that I have tried but, it’s also simple to setup and reasonably lightweight in terms of resources. Packaged versions of Deluge can be a bit old and not up to snuff, so I’ve written a simple bash script that will automatically install the latest version of Deluge from it’s source. The entire process, on a freshly installed VPS, takes approximately 5 minutes.
Observium is a neat PHP based system monitoring platform that I’ve been using lately, it’s fairly easy to install (Observium + Nginx/PHP-FPM install guide Coming Soon!) and provides a large variety of easy to read graphs of system information.
Observium is an autodiscovering SNMP based network monitoring platform written in PHP which includes support for a wide range of network hardware and operating systems including Cisco, Windows, Linux, HP, Dell, FreeBSD, Juniper, Brocade, Netscaler, NetApp and many more.
After the initial task of Observium host installation and configuration, you need install and configure SNMP daemon on all of your client servers, aka all the servers that you want to monitor. This can be quite annoying if you’re monitoring more then a handful of servers, thus I have taken the time to write bash script for installation of the SNMP daemon on a client server.
This is a little script I’ve been tinkering with for a bit now, it installs LXDE + NoMachine for remote desktop access. It’s a minimalist script based around low ram usage (perfect for LEBs!), it just installs a bare desktop, a web browser(iceweasel) and a means to access it, any other programs i.e. VPN, torrent client, etc.. must be installed by the user.
Update 1/05/15: An Android/iOS client is now available for NoMachine, please see the links below for the APK/iOS store link. I’ll be adding a configuration guide for the Android client shortly.
Update 3/24/14: Fixed an issue with package and client URLs not resolving, also fixed a bug in the libcairo section of the script. Please continue to report your feedback.
At the end of the script you will be asked if you want to create a user,
You cannot login to NoMachine as root
If you already have a non-root user, you don’t have to add another.
Add a new user? (y/n)
If you have already created a user enter n, if you have not created a user and only have the root then you should enter y and create a user at this time. You will be prompted you the username and desired password. (more…)